How To Build a Custom CentOS 7 Box in Vagrant (OSX Yosemite) From Scratch
Are you familiar with Vagrant? Beside the official definition Why Vagrant, in case you need a fast and solid environment to try out your software on VMs, then you have to give Vagrant a try because it can be seen as a wrapper on top of virtualization software that can speed up your work a lot. At the end of this tutorial you will be able to start new personalized machines in a matter of seconds.
In this How To we are going to prepare a Vagrant local environment box VM based on CentOS 7 minimal image, with dev support and some basic improvements.
Preliminary Steps:
Create a New Virtual Machine on Virtual Box with the following settings:
- Remove audio and USB
- New Virtual Disk: [Type: VMDK, Size: 40 GB]
- Verify that your main network is NAT Add this port-forwarding rule: [Name: SSH, Protocol: TCP, Host IP: blank, Host Port: 2222, Guest IP: blank, Guest Port: 22]
- Mount your CentOS 7 iso image and startup the VM
During installation, pay attention to the following steps:
- create a user vagrant with password vagrant and check the administrator option (click twice Done to accept this insecure password)
- set root password as vagrant (twice Done again)
After Reboot do the following steps:
- If you do not have a pair of RSA keys, generate these in OSX Terminal with the following command, leave password blank:
ssh-keygen -t rsa
Example:
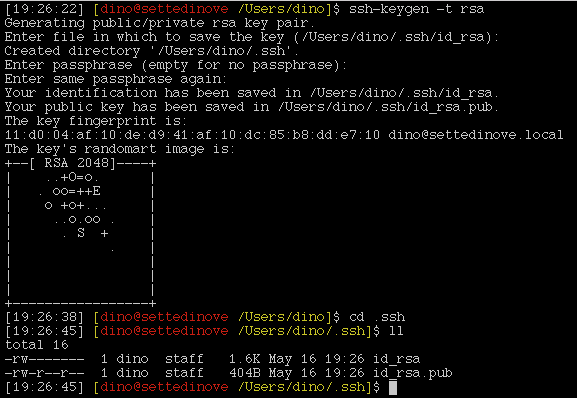
We will need those two files id_rsa and id_rsa.pub in the following steps.
- login into the VM as root doing
ssh root@127.0.0.1 -p 2222using password vagrant
If you have a LOCALE error inside the VM console, then you can solve the problem doing the following in OSX Terminal:
(OPTIONAL) LOCALE PROBLEM ON OSX via SSH
prevent sending LC_ALL variable to the server:
edit /etc/ssh_config and comment the following line with a #:
# SendEnv LANG LC_*
Setup the CentOS VM with base software:
yum groupinstall base
Configure SSH with no password login, this is crucial because without, Vagrant has a problem with ssh’ing VM asking for password:
-
vi /etc/ssh/sshd_config -
set no Password Authentication:
PasswordAuthentication no
Setup the vagrant user to be able to execute sudo commands without prompting you for a password:
visudo -f /etc/sudoers.d/vagrant
add in that file:
vagrant ALL=(ALL) NOPASSWD: ALL
and add the following line to the sudoers file doing visudo:
Defaults:vagrant !requiretty
- test the configuration with the following command:
sudo pwd
It will return the current working directory without asking for a password. If you are prompted for a password, something is wrong.
Install the public key id_rsa.pub in the VM
This is the way Vagrant will communicate with the VM. In OSX I had problems with “insecure vagrant key” and after googling a lot I realized that creating a fresh pair of keys solved the problem:
mkdir -p /home/vagrant/.ssh
chmod 0700 /home/vagrant/.ssh
vi /home/vagrant/.ssh/authorized_keys
copy id_rsa.pub content in this file (or use scp to transfer the file into the VM)
Example file content:
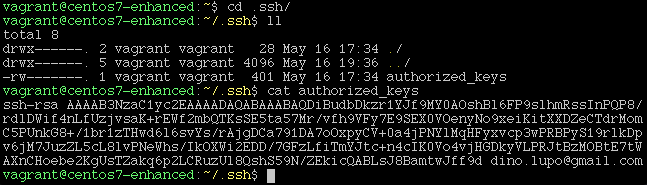
chmod 0600 /home/vagrant/.ssh/authorized_keys
chown -R vagrant:vagrant /home/vagrant/.ssh
service sshd restart
Install Guest Tools
- Host-D to mount Guest Tools CD-ROM (if centos iso is mounted, a screen like the following appears and you have to select force unmount)

yum install gcc make yum install “kernel-devel-uname-r == $(uname -r)” mount /dev/sr0 /mnt -r cd /mnt ./VBoxLinuxAdditions.run
Enhance your Centos bash experience with these files:
- .vimrc change colorscheme and add
command to clear search in VIM - .bashrc add a great command prompt for bash
- .dircolors I hate that blue color on shell folders…
source .bashrc
Note
copy the same files in /root folder and
vi /etc/hostname centos7-enhanced.localdomain
Correct vagrant 1.7.2 installation because of this bug
- From OSX Terminal (HOST machine) do the following:
sudo vi /opt/vagrant/embedded/gems/gems/vagrant-1.7.2/plugins/communicators/ssh/communicator.rb
line 171 : add .env after @machine :
@machine.env.data_dir.join("private_key").open("w+") do |f|

- Without shutting down the VM, open a new OSX Terminal, create a folder and write the following:
vagrant package --base vagrant-centos7-enhanced
You can rename the file with:
mv package.box centos7-enhanced.box

### Test your new base BOX
vagrant box add centos7 centos7-enhanced.box
vagrant init centos7
- modify Vagrantfile with the follwing, so you tell vagrant to use your private key to SSH without prompting for password:
  # SSH Agent Forwarding
  #
  # Enable agent forwarding on vagrant ssh commands. This allows you to use ssh keys
  # on your host machine inside the guest. See the manual for `ssh-add`.
  config.ssh.private_key_path = '~/.ssh/id_rsa'
config.ssh.forward_agent = true- to start the brand new box execute the following:
vagrant up
You can open other shells in the VM by executing:
vagrant ssh
If you want to ssh with standard commands, follow this link SSH login without password.
References:
StackOverflow Kernel Devel Differences